I say "Good Bye" to 2013 because it has not been a good year for me. I won't go into any details, please just take my word for it.
The reason I'm making this post is to say "THANK YOU"!
THANK YOU....to all my readers! This blog has been the best part of this year. When I started this blog my first thought was "Why would anyone be interested in the gardening that I do in my yard?" I thought I would give it a try and see how it went. I found out that a least a few people were interested. And I'm having fun doing it. I love being a part of the on-line gardening community! I have had readers from around the globe....this surprised me very much. I appreciate all your comments....please keep them coming!
I think this blog will get better with time, but I could use your help. If you have any ideas for making it better, please let me know.
So here's to 2014! May it be a better gardening year for all of us!
HAPPY NEW YEAR!
HAVE A SAFE NEW YEAR!
Soooo...... Until next time......HAPPY GARDENING!
Tuesday, December 31, 2013
Saturday, December 28, 2013
Seeds for Spring Garden
Hello folks!
Before Christmas, I couldn't stand it any longer......I ordered seed for my 2014 garden. After extensively searching through their on-line catalog, I placed an order with Southern Exposure Seed Exchange. They specialize in heirloom and open pollinated seed, specifically for the hot, humid climate of the southeastern states.

Before Christmas, I couldn't stand it any longer......I ordered seed for my 2014 garden. After extensively searching through their on-line catalog, I placed an order with Southern Exposure Seed Exchange. They specialize in heirloom and open pollinated seed, specifically for the hot, humid climate of the southeastern states.

Here is a list of what I ordered.
- SPANISH BROCAD FRENCH MARIGOLDS
- MAMMOTH SUNFLOWERS
- GREEN POD RED SEED ASPARAGUS BEAN (YARD LONG)
- DAIKON RADISH (MIYASHIGE WHITE)
- BLACK BEAUTY EGGPLANT
- JIMMY NARDELLO'S ITALIAN SWEET PEPPER
- ABRAHAM LINCOLN TOMATO
- TROPIC VFN TOMATO (Developed by the University of Florida)
- RIESENTRAUBE CHERRY TOMATO
- MATT'S WILD CHERRY TOMATO
- AMISH PASTE TOMATO
- ASIAN CUCUMBER (SUYO LONG)
- YELLOW CROOKNECK SQUASH
- SLO-BOLT LOOSE LEAF LETTUCE
- WILD GARDEN LETTUCE MIX
- HILL COUNTRY HEIRLOOM RED OKRA
- BUCKWHEAT (COVER CROP)
- CRIMSON CLOVER (COVER CROP)
As you can probably tell, I love growing tomatoes. I haven't ever grown any of these varieties, so this will be a year of experimenting to determine which will grow best in my area. After I find varieties that grow well and taste good, I plan on trying to cross breed some tomatoes and see if I can develop a tomato of my own.
A lot of these seed varieties were chosen because they are suppose to be able to take the heat or have good resistance to disease.
I'll be starting the tomatoes, pepper and eggplant inside in a few weeks so they will be ready for planting by March.
I CAN'T WAIT !!!
Also, a big "THANK YOU" to Southern Exposure Seed Exchange for their great, fast service.
They shipped out my order on Dec. 24th and I received it on the 26th.
Soooo......Until next time......HAPPY GARDENING!
Friday, December 27, 2013
Free Manure
Hello folks!
This morning I was thinking about the fertility of my new beds and heating up my compost piles so that they would decompose faster.
I was thinking..."If I had some manure it sure would be useful." So I got on Craigslist and typed "Manure" into the search box. Up came an ad that read "Free Horse Manure." I called the number and talked to a gentleman named Mike. He said "Sure, come on out and I'll help you load it." So I did just that.
Here is what I came home with!

This is going to be very useful. It didn't have any straw or saw dust in it and he assured me that there were no herbicides in it. He used it on his own garden.
So I'm going to use my compost sieve to break it down into smaller pieces and apply a couple of inches to my new beds. It should be pretty well decomposed by spring planting time. Then I'll turn all of my compost piles and add some to get them heating up. I can also add so to my worm bin. Worms love horse poo!
I think this was a great find and I was invited to come get more anytime I need it! I am pretty excited about this. My house mate started laughing and said "It doesn't take much to make you happy, does it." I replied "I'm a simple man!"
Soooo......Until next time......HAPPY GARDENING!
Tuesday, December 24, 2013
Christmas Eve 2013
Christmas Eve!
What a wonderful, happy day! I hope y'all are doing well today.
Have you got all your shopping done?
Don't forget......Lets keep Christ in Christmas! After all, He is the reason for the season!
Now on to a little gardening.....I harvested my first bunch of Turnips today. WOOHOO!

What a wonderful, happy day! I hope y'all are doing well today.
Have you got all your shopping done?
Don't forget......Lets keep Christ in Christmas! After all, He is the reason for the season!
Now on to a little gardening.....I harvested my first bunch of Turnips today. WOOHOO!

They have grown very well. The largest are about 3 inches in diameter. I'll be preparing these for a Christmas feast! They smelled real good as I was cleaning them to prepare for cooking. I like to cook mine with some smoked ham hocks and a little red Pepper flakes. YUM YUM!
I've got enough planted for a few more bunches. Hopefully, I can use them all before freezing weather hits us. I may have to cover them to prevent freeze damage.
Do you have a winter garden? If so, let me know what crops you're growing. I hope you are having good success with it.
Soooo...... Until next time......HAPPY GARDENING and MERRRRRY CHRISTMAS!
Monday, December 23, 2013
Back to Eden
Hello folks! I have just watched an incredible film called Back to Eden. It is about using wood chips to build your soil and to garden in. All gardeners, organic or not, should see this film. I'm seriously thinking of using this method for my future garden area.
Its 1 hour and 43 minutes long , but well worth watching! Try to find time to watch it and let me know what you think.
Click on the link and scroll to the bottom of the page to watch the film.
http://www.backtoedenfilm.com
Soooo......Until next time......HAPPY GARDENING!
Its 1 hour and 43 minutes long , but well worth watching! Try to find time to watch it and let me know what you think.
Click on the link and scroll to the bottom of the page to watch the film.
http://www.backtoedenfilm.com
Soooo......Until next time......HAPPY GARDENING!
Thursday, December 19, 2013
Digging New Beds 4
Hello folks! I have finally finished my new garden beds.
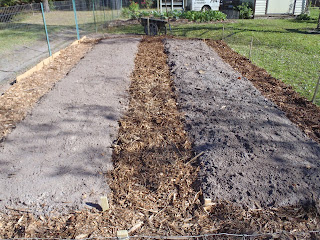
This is a beautiful sight for me. It took a long time to get this done, but these will be permanent beds ...it will be worth all the work in the future. I didn't keep track of how many hours it took to complete, but I estimate around 50 hours.
As with the first bed, I still need to dig in some lime.... about 5 pounds per 100 square feet. I'm also adding about 10 pounds of coffee grounds to add some nitrogen. I'm thinking this will help speed up the decomposition of the leaves that I dug in to the bed.
The lime that I'm using is a new product from a company named Sunniland. It is a blend of calcitic lime and dolomite lime. It adds calcium and magnesium and helps raise the ph of our acidic soil. I haven't had the soil tested, but this area is known to have acidic soil. Hopefully it will help.
Soooo......Until next time......HAPPY GARDENING!
Monday, December 16, 2013
Winter Gardening
Gardening slows down at this time of year, even in north Florida. I have my winter garden, but it doesn't require much work.....just a little weeding now and then, and harvesting every few weeks.

It has grown very well. I harvested my first bunch of Collards on Thanksgiving (should have took a photo...didn't think about at the time).

I'll harvest my first Turnip Greens for Christmas. I'll try to remember to get a photo when I do.
 At this time of year I spend a lot of time going through seed catalogs, planning my spring garden and day dreaming about spring planting. I have high hopes and a lot of excitement about how my garden will turn out. (I do this every year) I read a lot of gardening books and magazines for new ideas and inspiration.
I'll start Tomato plants inside next month, followed by Eggplant and sweet Peppers. Everything else will be direct seeded in the garden starting in March.
Recently, from you-tube, I have got new ideas about vermicomposting and something called wicking beds. I look forward to trying a wicking bed next year. That may be how I garden once I get too old for digging the earth. You can find a ton of information about wicking beds at "Rob Bob" on you-tube.
So if you aren't busy with your gardening at this time, enjoy the rest and relaxation. It won't be long before we will all be busy...busy ...busy with gardening activity! I don't know about you, but I can't wait!
Soooo...... Until next time......HAPPY GARDENING!

It has grown very well. I harvested my first bunch of Collards on Thanksgiving (should have took a photo...didn't think about at the time).

I'll harvest my first Turnip Greens for Christmas. I'll try to remember to get a photo when I do.

I'll start Tomato plants inside next month, followed by Eggplant and sweet Peppers. Everything else will be direct seeded in the garden starting in March.
Recently, from you-tube, I have got new ideas about vermicomposting and something called wicking beds. I look forward to trying a wicking bed next year. That may be how I garden once I get too old for digging the earth. You can find a ton of information about wicking beds at "Rob Bob" on you-tube.
So if you aren't busy with your gardening at this time, enjoy the rest and relaxation. It won't be long before we will all be busy...busy ...busy with gardening activity! I don't know about you, but I can't wait!
Soooo...... Until next time......HAPPY GARDENING!
Saturday, December 14, 2013
More on composting
Eliot Coleman and Barbara Damrosch have been gardening gurus for many years. I have learned from their gardening wisdom for over 30 years.
Here is a good video from them on composting and more. Although it has some age to it, true gardening wisdom never becomes out dated.
Here is a good video from them on composting and more. Although it has some age to it, true gardening wisdom never becomes out dated.
In the video it shows them layering brown and green materials. Recent research has show that mixing the materials is better for faster composting. Also, I find that some of the soil amendments like greensand may not be easy to find in some areas. They may have to be shipped which can get expensive. If you have easy access to these products that is great. But I try to use amendments that I can find locally. Actually, my gardening is slowly changing to using only free resources except for lime, which is pretty much required with our acidic soil.
Soooo......Until next time.......HAPPY GARDENING!
Friday, December 13, 2013
Gardening Community
I had to let the new beds rest for a while. I was getting behind on my other chores ....you know...the fun stuff like cleaning house and pulling weeds in the shrubbery beds. But now I'm back to working on it, although I don't feel the urgent need to get the last one finished quickly. I'm back to removing weeds in the area for the second bed.
Here is where I am now.

Now on to a different subject.
I enjoy being involved in the on-line gardening community. I've learned a lot by following blogs and you-tube channels. I would like to get more comments from readers. So if you have a blog or you-tube channel or just something to add to my post, please let me know in the comments section so I can follow along with what you are doing. As I've stated before, I'm not a gardening expert ... I'm always learning new techniques. I think all gardeners have something to add to the learning process. So let me know what you are doing in your garden and maybe we can get a conversation going.
Some of the methods I'm using are being used for the first time. My winter bed has been in for about 2 months now and I'm finding that using cardboard as a weed blocker doesn't work so well with some of these tough Florida weeds. After the cardboard gets wet, it turns to mush. I've learned that weeds with runners like Dollar weed, Betony and Bermuda grass will send runners under the cardboard and then pop right up through it. I have to dig down through the wood chips and tear the cardboard to get the weeds out. So I don't think I'll be using it much in the future. If you are experiencing the same, let me know.
So don't be shy, please leave a comment, let me know what you're up to!
Soooo......Until next time ......HAPPY GARDENING!
Wednesday, December 11, 2013
Practice What You Preach !!! (Revisited)
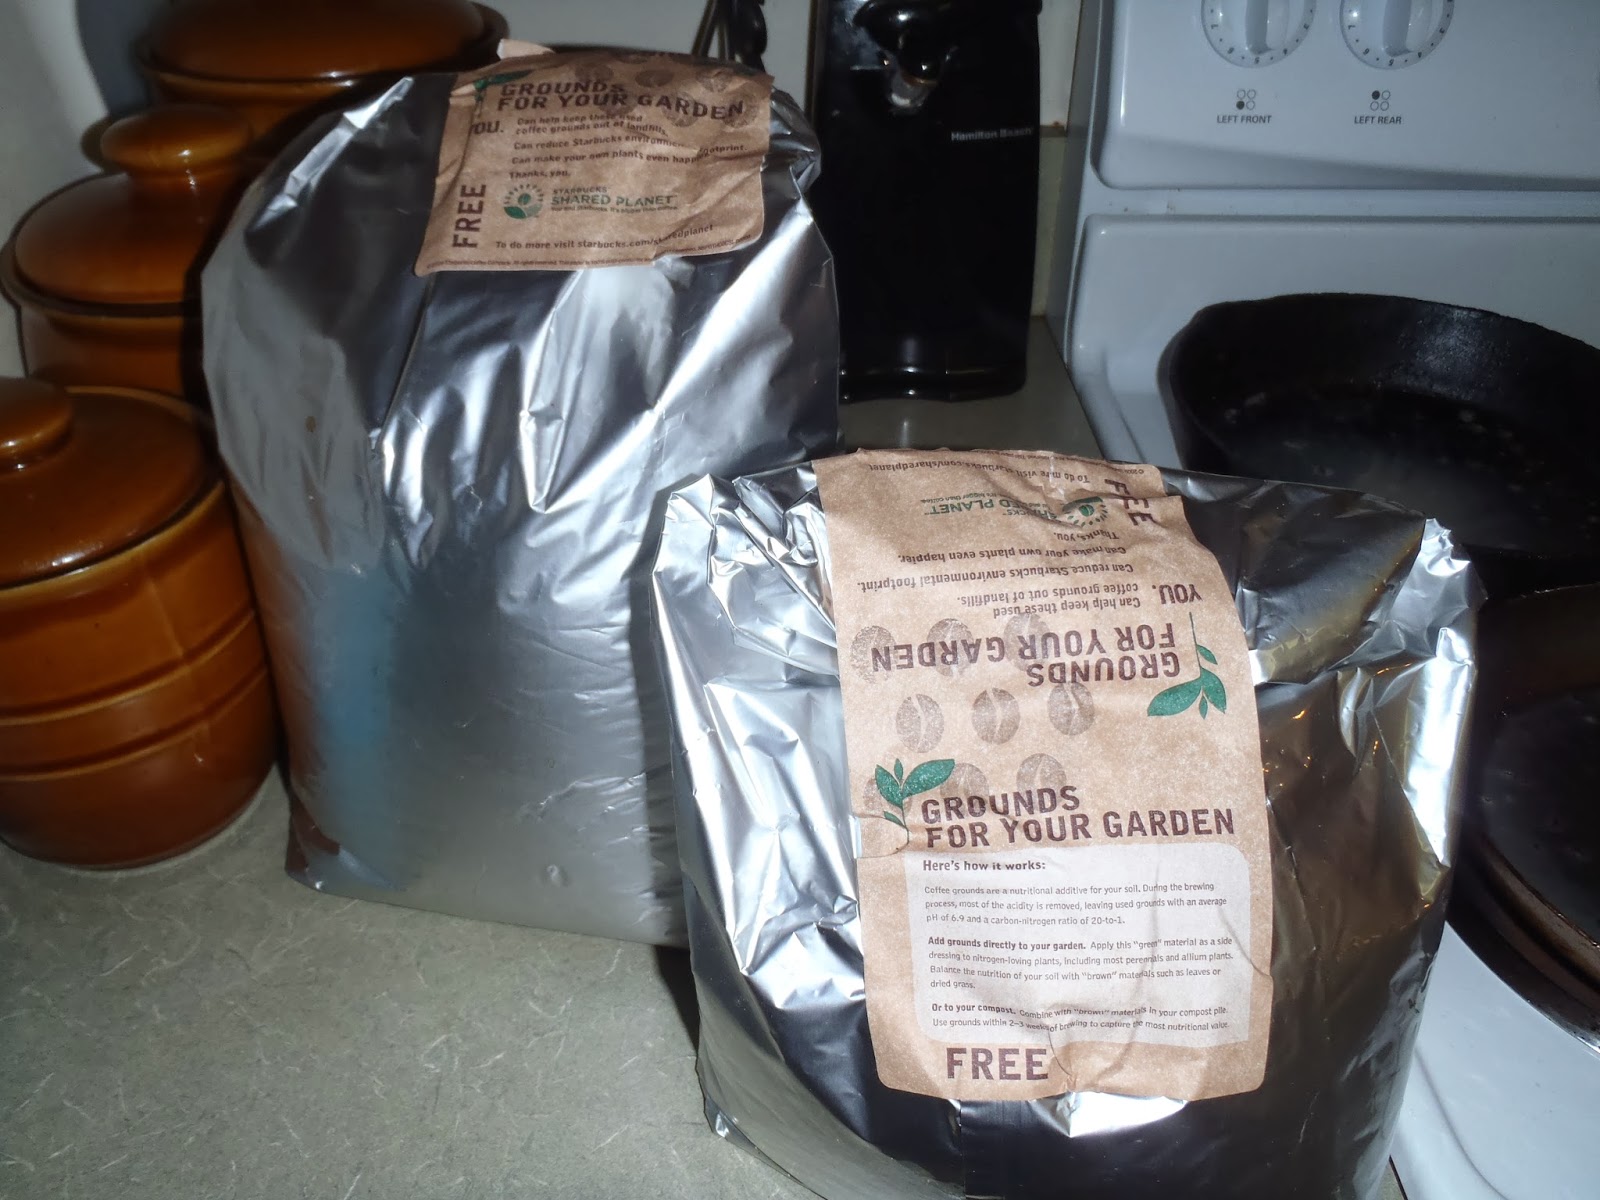
Sunday I visited a local Starbucks for the first time. I asked if they had any used coffee grounds. The young lady said "Sure" and gave me two water proof bags of grounds.

Right on the label it read...GROUNDS FOR YOUR GARDEN...FREE... along with instructions for how to use the grounds as a nitrogen fertilizer or in your compost pile. And a "Thank You" for taking the grounds! I was quite impressed! I suggest going to Starbucks for coffee and grounds, if there is one in your area. They cater to the organic gardener and are eco-friendly. WAY TO GO STARBUCKS!!
I left with 17 pounds of grounds!
So I spent the afternoon building a compost pile. Using the leaves I found the day before, I emptied the bags one at a time, spread them on the ground and pulled out the larger sticks.

Then used my bagging mower to shred them.
I suggest using a dust mask when doing this.


I plan on building some more smaller piles in 3 feet diameter cylinders made with chicken wire. I don't want to get into a jam and not have enough compost for my beds,ever again.
By the way, I was able to pick up 7 more bags of leaves from my neighbor up the street from me. That is a total of 21 bags so far and I'm sure I'll be getting more.
Soooo......Until next time....... HAPPY GARDENING!
Right on the label it read...GROUNDS FOR YOUR GARDEN...FREE... along with instructions for how to use the grounds as a nitrogen fertilizer or in your compost pile. And a "Thank You" for taking the grounds! I was quite impressed! I suggest going to Starbucks for coffee and grounds, if there is one in your area. They cater to the organic gardener and are eco-friendly. WAY TO GO STARBUCKS!!
I left with 17 pounds of grounds!
So I spent the afternoon building a compost pile. Using the leaves I found the day before, I emptied the bags one at a time, spread them on the ground and pulled out the larger sticks.

Then used my bagging mower to shred them.
I suggest using a dust mask when doing this.
Then spread them out in my compost bin and sprinkled on the grounds with the coffee filters.
Then I sprayed it down good with water. I added a little soil from the garden after every other layer to introduce micro-organisms to break down the leaves. I repeated this process till I used up all the grounds. This job took about 2 hours, but I ended up with a pile that's 4 feet by 4 feet by 3.5 feet high.

I plan on building some more smaller piles in 3 feet diameter cylinders made with chicken wire. I don't want to get into a jam and not have enough compost for my beds,ever again.
By the way, I was able to pick up 7 more bags of leaves from my neighbor up the street from me. That is a total of 21 bags so far and I'm sure I'll be getting more.
Soooo......Until next time....... HAPPY GARDENING!
Monday, December 9, 2013
Digging New Beds 3
Alright..... Here we go again!
After digging the leaves into the soil, I dug one to two inches of soil from the path on the left side of the bed and added it to the bed. This was to be sure all of the leaves were covered with soil. As I dug it out I sloped the soil toward the bed, so when we get heavy rain any excess water can drain into the bed and hopefully get stored in the loose subsoil.
After grading the path, I laid down a double layer of cardboard.

I'm leaving the path on the right side of the bed bare until I complete the second bed. Then I will use soil from the path to top off the second bed.
After laying down the cardboard, I covered it with a 3 inch layer of wood chips. I'm leaving the stakes on the corners to help guide hoses when I'm watering the beds.

So this bed won't need any more work until I need to apply compost about the second week of February. Hopefully my compost will be ready by then. Its not decomposing as quickly as I would like. When I built this pile I used a lot of Palmetto fronds and they aren't decomposing as fast as some of the other materials that I've used before....like oak leaves or banana leaves. I probably won't use the Palmetto leaves again when I'm trying to make compost quickly. But I will still use them for something.... I use all the organic material from my property some where.
So, I won't bore you with more step by step on the next bed, but I will post some photos of the completed project when it is finished.
Thanks for reading my blog!
Soooo...... Until next time......HAPPY GARDENING!
Sunday, December 8, 2013
Practice What You Preach !!!
In a recent post I encouraged you to pick up bags of leaves on the side of the road. Well ...... yesterday I was leaving my neighborhood and what did I spy? A large stack of black bags on the side of the road! I stopped and felt the bags to see if I could tell what was inside..... I had struck the MOTHER-LODE!

14 bags of leaves! I call it the Mother- Lode because I'm going to transform this find into BLACK GOLD! The Gardener's Gold! These came from in front of a house that had several Sycamore trees in the yard. I had to make two trips to get it all. And there were more leaves that had fell from the trees.....I'll be able to get more soon. All I have to do is wait for the owner to rake them up for me...Hehehe! Now I'm going to hit up some coffee shops for coffee grounds and build a few compost piles. I'll have plenty of compost by summer.
I just wanted to show you that I do.... Practice What I Preach!:)
Soooo......Until next time......HAPPY GARDENING! (AND COMPOSTING)
Saturday, December 7, 2013
Digging New Beds 2
Since my last post, I have removed the sod from the area for the first bed. I drove in stakes to mark the corners of the bed and pulled string around the stakes to out line the bed.

Here I have dug the first trench in the double digging process.

The soil was shoveled into my lawn cart until I need it to fill in the final trench at the other end of the bed. Digging for a few hours each day, it took two days to complete the digging. I was quite surprised at how tightly packed the subsoil was. It took more force than I thought it would to get the fork in to its full depth, so that I could fluff that layer. After digging I used a hard tine rake to smooth it off.

This bed is 4 feet wide and 25 feet long for a total of 100 square feet of growing space.
You might be able to see here that it created a raised bed about 4 inches high.

After smoothing the bed I topped it off with a layer of partially decomposed leaves and twigs, that I had from my last wood chip delivery. It does have some small wood chips mixed in, but it is the only organic matter that I have. With our warmer weather, the leaves have stopped falling so I'm just using what I have available.

I dug this into the soil in the hopes that it will decompose by March, when I will be planting my spring garden. I finished all of this up yesterday at about 4:30. At this point I was pretty much exhausted, so I will continue this in my next post. Then I will show how I do the paths around the bed.
Soooo......Until next time......HAPPY GARDENING!
Thursday, December 5, 2013
Double Digging
I was introduced to growing vegetables in beds and double digging back in 1980 when I started reading Mother Earth News Magazine. Before that I had always grown in rows. Double digging was not new at that time, but few gardeners used the technique.
Basically, double digging is loosening and fluffing the soil to a depth of 2 feet. It aerates the soil and allows roots to penetrate deeply into the soil. Water from surrounding soil also settles into the deeply loosened soil, directly below your crops.
I am going to be double digging my new beds and want to be sure everyone knows how it is done.
Here is a great video that explains it very well.
Double digging is more widely used by serious gardeners today. I used it exclusively when I was young. At one point I moved to an area that had hard clay soil. I bought a tiller and got away from digging by hand. At that time in my life I was trying to feed a family of four.
Now days, I have gotten older and don't have so many mouths to feed. I'm back to gardening in Florida's sandy soil. I feel that gardening with hand tools is good exercise for this old body. So I'm back to double digging. I like the results I'm getting from it, too.
Cindy Conner from www.homeplaceearth.wordpress.com states that double digging is only necessary when first digging a bed. This may be because she practices no-till gardening. I tend to agree with her because with all the organic matter being added to the soil from compost and cover crops, earthworms will be active in the beds keeping the soil loose and friable. One can also grow cover crops, such as Daikon Radishes, that aid in keeping the soil loose.
So, I encourage you to double dig at least one bed and compare the growth from that bed with other beds you may have. A good method of comparing is to grow the same crops in two beds. One that has been double dug and one that hasn't. It doesn't have to be a large bed. I'm sure you will see a noticeable difference in the two beds.
Then you will be a double digging convert like me!
Soooo...... Until next time......HAPPY GARDENING!
Tuesday, December 3, 2013
ARE YOU GETTING PROPER NUTRITION?
You need to see this! Please try to find time!
www.foodmatters.tv/free
1 hour, 18 minutes
Only 0 days left to see this free!
www.foodmatters.tv/free
1 hour, 18 minutes
Only 0 days left to see this free!
Monday, December 2, 2013
Digging New Beds 1
I have started a new gardening project......digging new beds for spring planting. I'm digging these beds inside of a small part of my yard that has been fenced for pets. I am going to grow in the fenced area to keep rabbits and raccoons out of the garden. I have added a fence that is 2 feet high to keep my dog out. You may be able to see it in this photo.

These beds will add 200 square feet of growing space. Because of the dog fencing, it will have a 24 inch wide path all the way around inside the fence and one between the beds.
In one of my post a reader commented that he liked the step by step photos, so I am going to do step by step photos with this. This will take so long to complete that it will require more than one post to cover it all.
I have another area in my yard where I have room for 800 square feet of beds. I have to fence it first to keep out the critters. After it is fenced I plan to add two 100 square foot beds each year. Hand digging 200 square feet of growing space is a lot of work for one person! But I think it is good for the body and the soul.
Don't you agree? ... ;)
After working on this project for several hours over the last two days, I can see that this is going to take a lot of time to complete. I have decided to get one bed completed with the paths around it. This is so that I can get some leaves turned into the bed and give them time to decompose and add organic matter to the soil by spring.
Here is how far I have gotten at this point.

I'm removing the sod instead of turning it under because it is all weeds. Some of them (Dollar weed) would quickly regrow if turned under. The sod is being used to fill in a low spot in my yard.
Soooo......Until next time......HAPPY GARDENING!
Subscribe to:
Posts (Atom)